
- Planning the Irrigation System
- Sprinkler Irrigation
- Drip Irrigation
- The Distribution System
- The Water Source
- Backflow Prevention
- Irrigation Scheduling App for Turf
Georgia averages about 50 in. of rainfall per year, which is more than enough to supply the total water requirements of most plants. This rain, however, does not always fall in sufficient quantities during the time of year when it is most needed by the plants. In order to maintain a lush green lawn and productive garden, supplemental water in the form of irrigation is often needed during peak water use periods.
Two basic types of irrigation are suitable for the home landscape: sprinkler irrigation and drip (or trickle) irrigation. Numerous types of sprinklers are available and, if selected properly, can be adapted to cover almost any area. Sprinklers are usually the best choice for turf areas. Drip irrigation has been increasing in popularity during the past few years and is especially suitable for watering individual plants such as shrubs and trees and can also work well for ornamental or vegetable gardens. Some drip irrigation systems also work well with row crops grown in the garden.
Planning the Irrigation System
An irrigation system may be as simple as a sprinkler connected to a water hose, or it may be as complicated as a system of underground pipelines with multiple circuits and automatic controls. This publication deals primarily with the more complex systems, but most of this information can be applied to any lawn or garden irrigation system.
A step-by-step design procedure is not always a simple matter. A number of factors are involved. With sprinkler systems especially, the types and number of sprinklers must match the pressure and volume capacity of the water supply. Also, the application rates from sprinklers and drip emitters should be low enough to prevent excessive runoff from the soil surface but high enough to meet the water requirements of the crops. Selecting the best sprinklers and/or emitters and spacing for a particular system can be a process of trial and error. Several factors must be known prior to planning an irrigation system:
- irrigation requirements of targeted crop or plants;
- shape of the area;
- soil type (intake capacity/soil water holding capacity);
- water source;
- operational requirements (hours per day, automatic or manual controls, etc.).
Sometimes the water supply already exists, and the system must be designed with the pressure and volume limitations in mind. In other instances, the water source requirements will be determined from the irrigation design, and the water supply will be installed accordingly. At any rate, you must consider all of the preceding factors while planning an effective irrigation system.
This publication provides the basic information for designing most lawn or garden irrigation systems and for selecting the best type of system for a particular situation. The order in which various subjects are discussed in this publication is not necessarily the order in which they should be addressed in designing a system. The design procedure will vary for each individual set of circumstances.
This publication cannot answer every question that might arise concerning lawn and garden irrigation. For instance, water requirements for particular crops and plants have been intentionally omitted. This information is available from a number of sources, including other Extension publications and your local county Extension agent. If you have additional questions, seek professional help either from your county Extension agent or your local irrigation dealer.
Sprinkler Irrigation
Types of Sprinklers
Rotary sprinklers and spray heads are the most common types of sprinklers used in lawns and gardens. Both types have specific operating characteristics and are designed for particular applications.
Rotary sprinklers (Figure 1) generally operate at high pressures (30 to 80 lb per square inch [psi]) and cover large areas (a 30- to 50-ft radius). They usually have an application rate between 0.2 and 0.5 in. per hour. Rotary sprinklers often are the most economical choice for large gardens and large, open turf areas. Rotary sprinklers can be mounted on permanent risers or used with quick coupling valves that allow them to be moved from one location to another. Rotary pop-up heads are also available. These are installed flush with the soil surface and pop up above ground level when water pressure is applied. They are particularly useful in turf areas since they are out of the way of lawn mowers and other traffic.
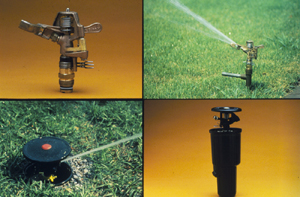 Figure 1. Rotary Sprinklers.
You may wish to keep water away from adjacent areas such as sidewalks or sides of buildings. For this type of application, part-circle rotary sprinklers are available. These are usually adjustable, and the arc of throw typically can be varied between 20 and 360 degrees.
Spray heads (Figure 2) are designed to operate at lower pressures than rotary sprinklers (usually 15 to 35 psi). They cover a smaller area than rotary sprinklers (10- to 20-ft radius) and apply from 1 to 2 in. per hour. This characteristic may limit their use and length of application in heavy soils or in areas with excessive slopes. Spray heads are most often used in small or narrow turf areas and irregularly shaped areas.
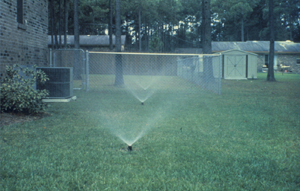 Figure 2. Spray Heads.
As with rotary sprinklers, spray heads can be mounted on permanent risers or are available as pop-up types to be used in turf areas. Spray heads are available in numerous configurations so they may be adapted to cover almost any shaped area. You can buy full circles, half circles, quarter circles and even square and rectangular patterns. As a general rule, all sprinklers used in the lawn and garden should be installed on a swing joint or a flexible riser. This is especially true for popup sprinklers. The swing joint allows the sprinkler to be adjusted flush with ground level. It also prevents the sprinkler and underground pipe from being damaged in the event they are run over by heavy equipment.
Sprinkler Spacing
To achieve a uniform application of water over the irrigated area, the sprinklers must be spaced properly. When operated at the proper pressure, most sprinklers apply more water in the center of the pattern than at the edges (Figure 3). They must be overlapped in order to give uniform distribution (Figure 4). The amount of overlap depends on the sprinkler spacing pattern and the typical wind conditions at the time the sprinklers will be used.
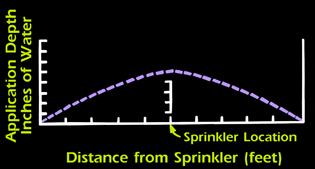 Figure 3. Single sprinkler.
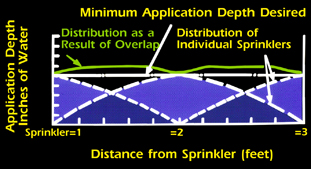 Figure 4. Distribution With Overlap.
The two types of sprinkler spacing patterns most commonly used are square spacing (Figure 5) and triangular spacing (Figure 6). A rectangular pattern may also be used in some instances.
A square pattern is achieved when the distance between sprinklers (S) is the same as the distance between rows (L). The square pattern is usually used in square or rectangular areas, which require part-circle sprinklers along the boundaries and in the corners. Table 1 gives the recommended square pattern spacing for various wind conditions. These recommended spacings are based on a percentage of the wetted diameter of the sprinklers as given by the manufacturer's specifications.
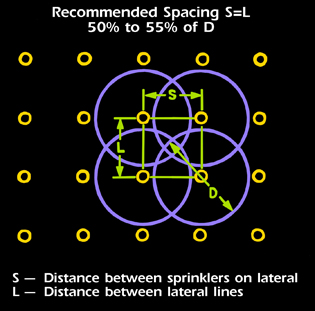 Figure 5. Square Spacing Pattern.
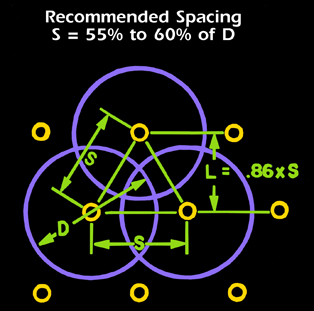 Figure 6. Equilateral Triangle Spacing Pattern.
| For a Wind Velocity of: | Use a Maximum Spacing of: |
|---|---|
| 0 to 3 mph | 55% of Diameter D |
| 4 to 7 mph | 50% of Diameter D |
| 8 to 12 mph | 45% of Diameter D |
An equilateral triangle pattern has all sprinklers an equal distance (S) from each other. With this pattern, the distance between rows of sprinklers (L) is .86 times the distance (S). A triangular pattern is generally used in areas with irregular boundaries or areas that do not require part-circle sprinklers along boundaries. Table 2 lists recommended spacings for the triangular pattern.
| For a Wind Velocity of: | Use a Maximum Spacing of: |
|---|---|
| 0 to 3 mph | 60% of Diameter D |
| 4 to 7 mph | 55% of Diameter D |
| 8 to 12 mph | 50% of Diameter D |
You may need to make adjustments in the preceding guidelines because of irregularly shaped areas or obstructions. For instance, the square and triangular patterns can be combined in the same area to avoid an obstruction. Adjustments are acceptable so long as the proper distances between sprinklers are maintained. This process is called a "sliding spacing."
Determining Application Rates
Sprinklers are selected according to output volume, or gallons per minute (gpm), and wetted diameter (feet). The output volume of a sprinkler is primarily determined by nozzle size and pressure. Though also a function of nozzle size and pressure, wetted diameter is greatly affected by the type of sprinkler.
Generally, the manufacturer's specifications will give the output volume and wetted diameter for different nozzle sizes and operating pressures. If this information is not available, the output volume of a particular sprinkler can be determined in two ways. Since output volume depends on nozzle size and pressure, Table 3 can be used for most sprinklers. The other method is to apply the desired pressure to the sprinkler and catch the water in a bucket for one minute. This volume of water can then be measured in gallons to determine a flow rate in gallons per minute.
| PSI | Nozzle diameter in inches | ||||||||||
|---|---|---|---|---|---|---|---|---|---|---|---|
| 1/16 | 5/64 | 3/32 | 7/64 | 1/8 | 9/64 | 5/32 | 11/64 | 3/16 | 13/64 | 7/32 | |
| 20 | 0.52 | 0.81 | 1.17 | 1.59 | 2.09 | 2.65 | 3.26 | 3.92 | 4.69 | 5.51 | 6.37 |
| 25 | 0.58 | 0.90 | 1.31 | 1.78 | 2.34 | 2.96 | 3.64 | 4.38 | 5.25 | 6.16 | 7.13 |
| 30 | 0.64 | 1.00 | 1.44 | 1.96 | 2.56 | 3.26 | 4.01 | 4.83 | 5.75 | 6.80 | 7.85 |
| 35 | 0.69 | 1.08 | 1.55 | 2.11 | 2.77 | 3.50 | 4.31 | 5.18 | 6.21 | 7.30 | 8.43 |
| 40 | 0.74 | 1.15 | 1.66 | 2.25 | 2.96 | 3.74 | 4.61 | 5.54 | 6.64 | 7.80 | 9.02 |
| 45 | 0.78 | 1.22 | 1.76 | 2.40 | 3.13 | 3.99 | 4.91 | 5.91 | 7.03 | 8.30 | 9.60 |
| 50 | 0.83 | 1.36 | 1.94 | 2.63 | 3.46 | 4.37 | 5.39 | 6.48 | 7.77 | 9.12 | 10.50 |
| 60 | 0.90 | 1.40 | 2.03 | 2.76 | 3.62 | 4.50 | 5.65 | 6.80 | 8.12 | 9.56 | 11.05 |
The best way to determine the wetted diameter is to set up a single sprinkler at the desired height, apply water pressure and measure the distance of water throw. The type and size of sprinkler selected depends on the water supply available (volume and pressure) and the area to be covered.
Another factor to consider when you choose sprinklers is the application rate. Application rate is the rate (usually given in inches per hour) at which a particular sprinkler applies water to the soil. If the application rate exceeds the intake capacity of the soil for extended periods of time, undesirable puddling and runoff occur. The intake capacity of the soil depends on several factors, including soil type (sand, loam, clay), vegetative cover and slope. Table 4 gives an estimate of intake capacities for different soil types. These estimates will be somewhat higher when vegetative cover is present.
| Surface Texture of Soil | Intake Rate (inches/hour) |
|---|---|
| sandy; loamy sand | 2.0–3.5 |
| sandy loam; loam | 1.5–2.5 |
| silt loam; clay loam | 0.5–1.5 |
| sandy clay; clay | 0.2–0.5 |
Use the following equation to determine the application rate for a given sprinkler and spacing pattern:
AR = (96.3 x Q) / (S x L)
where:
AR = application rate (in./hr)
Q = gallons per minute applied by one full circle sprinkler
S = spacing between sprinklers (ft)
L = spacing between rows of sprinklers (ft)
If the calculated application rate is significantly higher than the intake rate of the soil, select a smaller nozzle size. As another option, use a sprinkler with a larger wetted diameter and increase the sprinkler spacing accordingly.
Where part-circle sprinklers and full-circle sprinklers are controlled by the same valve, reduce the nozzle sizes on the part circles so the sprinkler output rates are proportional to the area the sprinkler covers. For instance, a half-circle sprinkler should put out half as much water as a full-circle; a quarter-circle sprinkler should put out one-fourth as much as a full-circle.
Drip Irrigation
Drip irrigation is the frequent, slow application of water to soil through mechanical devices called emitters. Emitters are built into or attached to small plastic water delivery lines that carry water to each plant to be irrigated. This method of application eliminates most water losses and assures reasonably uniform distribution. It also allows you to closely monitor the amount of water applied. Because drip irrigation allows close control of the distribution and amount of water applied and reduces evaporation losses, it uses less water. Drip irrigation can be used for growing vegetables, ornamental and fruit trees, shrubs, vines and outdoor container plants. It is not well adapted to solid plantings of shallow-rooted plants, such as grass and some ground covers.
System Description
A drip irrigation system consists of emitters, lateral lines, main lines and a control station. Emitters, which control water flow from lateral lines into soil, vary in type from porous-wall (line source) units to individual (point source) units (Figure 7). Emitters decrease the pressure from the inside to the outside of the lateral and allow the water to emerge as droplets. This may be accomplished by small orifices, larger orifices in series, long passageways, vortex chambers, flexible discs, or other mechanical means. Some emitters maintain steady flow at different pressures by changing the length or cross section of passageway. These are called pressure compensating emitters. Rate of flow for point source emitters usually is fixed at from 1/2 to 2 gallons per hour (gph); 1 gph is the most common rate.
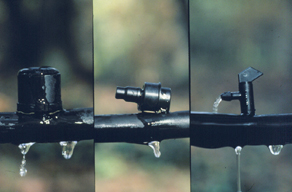 Figure 7. Typical Drip Emitters.
Line source emitters usually consist of a porous wall tubing or a twin chamber-type tubing with small orifices at fixed spacings. This tubing works well for row crops in the garden and for closely spaced ornamentals. Output is usually given in gallons per minute per 100 ft of length.
Emitters are connected to or are a part of the lateral lines, which are usually small diameter black polyethylene tubing (3/8 to 3/4 in.).
Main lines, usually buried plastic pipe, convey water from the control station to the lateral lines. Main line size depends upon the number of laterals and the flow of water to them.
At the control station (Figure 8), water is filtered or screened and regulated as to pressure and application timing. Generally, to prevent emitter clogging, water used for drip irrigation must be as clean as drinking water (either initially or after filtration). Various types of sand filters, cartridge filters, disk filters or screens of 100 to 200 mesh may be used to clean the water. A small screen filter sized for the given flow is usually sufficient for landscape and garden applications, particularly if the water supply is the same as that used for the house. However, if the water supply is coming from another source such as a pond or creek, a more substantial filter will be needed.
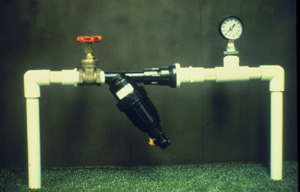 Figure 8. Typical control station for a small drip irrigation system; the pressure gauge is optional; the control valve can be electric or manual.
Most systems require some pressure regulation; an in-line preset pressure regulator usually is used. Pressure requirements for different emitters vary from 2 or 3 psi to 30 or 40 psi. Most point source emitters are designed to operate at 15–20 psi.
You can control applications either manually with gate valves or automatically with an electric time clock and electrically operated valves. With the time clock, water applications can normally be varied between 15 min and 24 hr per day. You can buy time clocks that will control one valve or multiple valves on varying schedules.
Though an increasing number of firms will custom design and install home drip irrigation systems, you may be able to design and install your own. If you decide to perform a self-installation, check local codes for proper locations and requirements of backflow devices.
System Operation
With drip irrigation, water applications are typically frequent; this means daily or on alternate days during the growing season. Plants deplete the water faster in the small root volume wetted. Also, drip irrigation is intended to prevent plant stress by maintaining an optimum moisture level in the soil environment. This requires water applications to be frequent to prevent the soil from drying out.
Application duration should be the time needed to apply the water consumed since the previous irrigation. It may range between one and 16 hr and should not be continuous. If the system needs to be operated more than 16 hr a day regularly, increase the number of emitters. Duration should not extend beyond the time when ponding or runoff starts; this can be avoided by turning off the water and restarting it later.
Clean filters and screens periodically by hand or by built-in backflushing to make sure your drip system functions properly. Depending on water quality and filter size, flushing may be required weekly, twice a week, or twice a month. Once a year, open the end of each lateral line to flush out accumulated sediment.
To become familiar with a new drip system, turn it on for a short time each day and then evaluate the soil moisture condition before irrigating again. Soil moisture can be judged either by sampling with a soil coring device or auger, or by installing a soil moisture measuring instrument. (Make your measurement 8 to 12 in. from an emitter beneath the leafy portion of the plant.) Wetness of a soil sample can be judged by its feel and appearance.
The Distribution System
In designing any type of irrigation system, whether sprinkler or drip, pipe sizing is one of the most important considerations. As water flows through a pipe, the water pressure decreases due to the friction of the water against the walls of the pipe. This pressure loss increases with increasing water flow and length of pipe, so larger pipe sizes are required for higher flow rates, especially in systems with long stretches of pipe.
Pressure
Pressure is defined as a force over a particular area and is usually given in pounds per square inch or feet of water. A head of 1 ft of water is equal to 0.43 psi. This figure is derived from the fact that a 12-in.-high column of water with a 1 in. by 1 in. base weighs 0.43 lb. Since the area of the base is 1 square inch, the pressure on the bottom is 0.43 psi.
In a lawn irrigation system, three components determine the pressure requirement of the system: (1) the pressure required to operate the sprinkler or emitter, (2) the pressure loss due to friction in the pipe and fittings and (3) the pressure loss or gain due to elevation differences. More pressure is needed to pump water uphill. Therefore, 0.43 psi is added to the pressure requirement for each foot of rise in elevation. Conversely, 0.43 psi is gained for each foot of drop in elevation when water flows downhill. Most lawns, however, are flat enough that the elevation component can be ignored. Since elevation can usually be ignored, and the pressure required on the sprinkler or emitter is already known, then the only pressure component left to be determined is the friction loss in the pipes and fittings.
Pipe Sizing
Proper pipe size selection is essential to ensure adequate pressure for all sprinklers or emitters and to keep pressure variations on a circuit within reasonable limits. In order to maintain good uniformity of water application, the pressure variation on a circuit should be no more than 20% for sprinklers and non-pressure compensating emitters. Greater pressure differences may be allowed with pressure compensating emitters as long as the pressure stays within the emitter's range.
Select pipe sizes so the water velocity in the pipes does not exceed 5 ft per second; then determine the pressure difference between the first and last sprinkler on the circuit. If the difference is greater than 20%, you can test larger pipe sizes until the pressure difference is reduced to an acceptable level. Pressure losses are usually given in psi per 100 ft in tabulated form as in Table 5 (which also gives the velocity for a given flow rate for each pipe size). The velocity for any pipe size may be determined from the following equation:
V = Q / (2.45 x D2)
where:
V = velocity (ft/sec)
Q = flow rate (gal/min)
D = inside diameter of pipe (in.)
Using Table 5 for PVC pipe, the pipe size for each section can be selected so the velocity is less than 5 ft per second (Figure 9).
Assume each sprinkler has an output of 5 gallons per minute and that the desired pressure at the last sprinkler is 40 psi. The next step is to add up the pressure losses between the first and last sprinklers on the circuit:
Press. Loss (B to E) = Press. Loss (B to C) + Press. Loss (C to D) + Press. Loss (D to E) = 1.34 psi + 2.145 psi + 2.07 psi 5.55 psi
Therefore, if the pressure at the last sprinkler is 40 psi, then the pressure on the sprinkler at point B is 45.55 psi.
Pressure at B = 40 psi + 5.55 psi = 45.55 psi
The percent pressure difference between the first and last sprinkler on the circuit can be determined as follows:
% Difference = {[Pressure (first) - Pressure (last)] / Pressure (last)} x 100 = [(45.55 - 40.00) / 40.00] x 100 = 13.87%.
Since the difference is less than 20%, the selected pipe sizes are sufficient.
You can use the same procedure for sizing pipe for a drip system. The only difference is that the outlets from the pipe line are sections of drip tubing rather than sprinklers.
| Flow (gal/ min) |
Pipe size (inches) | |||||||||||||||||
|---|---|---|---|---|---|---|---|---|---|---|---|---|---|---|---|---|---|---|
| ½ | ¾ | 1 | 1¼ | 1½ | 2 | 2½ | 3 | 4 | ||||||||||
| V | P | V | P | V | P | V | P | V | P | V | P | V | P | V | P | V | P | |
| 5 | 3.94 | 4.14 | 2.36 | 1.19 | 1.43 | .35 | .87 | .10 | .67 | .05 | ||||||||
| 6 | 4.73 | 5.80 | 2.83 | 1.67 | 1.72 | .49 | 1.04 | .14 | .80 | .08 | ||||||||
| 8 | 6.30 | 9.87 | 3.78 | 2.84 | 2.29 | .84 | 1.39 | .24 | 1.06 | .13 | .68 | .04 | ||||||
| 10 | 7.88 | 14.91 | 4.72 | 4.29 | 2.86 | 1.27 | 1.47 | .37 | 1.33 | .20 | .85 | .07 | .58 | .03 | ||||
| 15 | 7.08 | 9.08 | 4.29 | 2.68 | 2.61 | .78 | 2.00 | .41 | 1.27 | .14 | .87 | .05 | ||||||
| 20 | 9.44 | 15.46 | 5.72 | 4.57 | 3.49 | 1.33 | 2.66 | .70 | 1.70 | .24 | 1.16 | .09 | .78 | .04 | ||||
| 25 | 7.15 | 6.90 | 4.35 | 2.01 | 3.33 | 1.06 | 2.12 | .36 | 1.45 | .14 | .97 | .05 | ||||||
| 30 | 8.58 | 9.67 | 5.22 | 2.81 | 4.00 | 1.49 | 2.55 | .50 | 1.74 | .20 | 1.17 | .08 | ||||||
| 35 | 6.10 | 3.74 | 4.66 | 1.98 | 2.98 | .67 | 2.03 | .27 | 1.35 | .10 | ||||||||
| 40 | 6.95 | 4.79 | 5.33 | 2.54 | 3.40 | .86 | 2.32 | .34 | 1.56 | .13 | .94 | .04 | ||||||
| 45 | 6.00 | 3.16 | 3.84 | 1.06 | 2.61 | .42 | 1.75 | .16 | 1.06 | .05 | ||||||||
| 50 | 6.66 | 3.84 | 4.25 | 1.29 | 2.90 | .51 | 1.95 | .19 | 1.18 | .06 | ||||||||
| 60 | 8.00 | 5.38 | 5.10 | 1.81 | 3.48 | .72 | 2.33 | .27 | 1.41 | .08 | ||||||||
| 70 | 9.32 | 7.15 | 5.95 | 2.41 | 4.06 | .96 | 2.72 | .36 | 1.65 | .11 | ||||||||
| 80 | 6.80 | 3.08 | 4.64 | 1.23 | 3.11 | .46 | 1.88 | .14 | ||||||||||
| 90 | 7.65 | 3.84 | 5.22 | 1.53 | 3.50 | .58 | 2.12 | .17 | ||||||||||
| 100 | 8.50 | 4.66 | 5.80 | 1.85 | 3.89 | .70 | 2.35 | .20 | ||||||||||
| 125 | 10.60 | 7.04 | 7.25 | 2.80 | 4.86 | 1.06 | 2.94 | .31 | ||||||||||
| 150 | 8.80 | 3.93 | 5.81 | 1.48 | 3.53 | .43 | ||||||||||||
| 175 | 10.15 | 5.22 | 6.81 | 1.97 | 4.11 | .58 | ||||||||||||
| 200 | 7.78 | 2.60 | 4.70 | .76 | ||||||||||||||
| Note: Velocity values of more than 5 ft per second should be selected with caution. V - Velocity in ft/sec P - Pressure drop in psi |
||||||||||||||||||
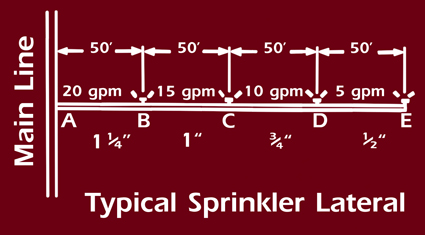 Figure 9. Typical Sprinkler Lateral.
Size the main lines that supply the individual circuits with a maximum velocity of 5 ft per second. If the lines are excessively long, or if the available pressure at the supply is limited, you may want to select larger pipes than indicated by this guideline. The total system pressure requirement can be determined by taking the pressure at the last sprinkler in the system and adding pressure losses all the way back to the water source. Include pressure losses through check valves, control valves, etc. These pressure losses are usually published by the valve manufacturer.
The Water Source
House wells or city water mains usually provide water for lawn and garden irrigation systems. In these instances, you need to determine the volume of water available and the pressure at which it can be supplied.
To determine the capacity of an existing well, first ensure that there is an operating pressure gauge at the well discharge or on the pressure tank. Open enough faucets so the well pump comes on and stays on. Allow the pressure to stabilize and note the reading. The pressure should then be adjusted to match the pressure required by the sprinkler system (usually 40–60 psi). You can increase the pressure at the well by gradually closing one of the faucets. Decrease the pressure by opening another faucet. Once the pressure is stabilized at the desired operating pressure (this may take several minutes), measure the flow rate from each faucet in gallons per minute by using a 5-gallon bucket and a stopwatch. The combined flow from all of the faucets is the pumping capacity of the well at the desired operating pressure.
The volume of water available from a city water system primarily depends on the size of water meter supplying the water. The static water pressure in a city main can vary from 30 psi to well over 100 psi; therefore, it is a good idea to measure the pressure yourself. Attach a pressure gauge to any outside faucet as in Figure 10. Make sure all other outlets are closed and open this faucet fully. The pressure shown on the gauge is the available static pressure in the city main. This pressure should be measured at several different times during the day to determine the minimum pressure.
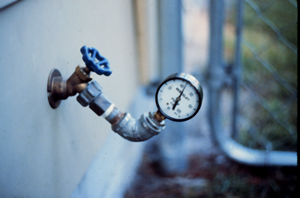 Figure 10. Pressure Gauge on Outside Faucet.
Pressure loss through the meter should not be greater than 10% of the available static pressure. Table 6 lists pressure losses through city water meters for various flow rates. If you have 60 psi static pressure, pressure loss through the meter should be no more than 6 psi (take 10% of 60). On the chart, assume you have a 5/8-in. meter and follow that column until you find 6. Since the closest number is 6.1 at 13 gallons per minute, you must drop back to 12 gallons per minute delivery for a 5/8-in. meter at 60 psi.
In no case should flows greater than 75% of the maximum safe flow for the meter be used for design purposes. (According to Table 6, for a 5/8-in. meter, take 75% of 20 gpm = 15 gpm.)
The size of an existing water meter is usually cast or stamped into the meter case adjacent to the meter dial. The nominal size should also be found on the dial. Once the meter size is located, the available water supply can be determined using the preceding guidelines. The capacity of the supply tap from the water main to the meter should also be checked.
If the existing meter is not large enough, or if sewage charges are based on water use, you may want to install a separate meter strictly for irrigation. Most municipal water systems will install a second meter for a set fee. Given the volume of water available and the output of each individual sprinkler, divide the area into zones so all sprinklers in each zone can be operated at once. For instance, if the water capacity is 12 gallons per minute, and each sprinkler has an output of 2.5 gallons per minute, a maximum of four sprinklers can be supplied in each zone.
| Flow (gallons/min) | Meter size (inches) | ||||
|---|---|---|---|---|---|
| 5/8 | 3/4 | 1 | 1½ | 2 | |
| 1 | 0.2 | 0.1 | — | — | — |
| 2 | 0.3 | 0.2 | — | — | — |
| 5 | 0.4 | 0.3 | — | — | — |
| 4 | 0.6 | 0.4 | 0.1 | — | — |
| 5 | 0.9 | 0.6 | 0.2 | — | — |
| 6 | 1.3 | 0.7 | 0.3 | — | — |
| 7 | 1.8 | 0.8 | 0.4 | — | — |
| 8 | 2.3 | 1.0 | 0.5 | — | — |
| 9 | 3.0 | 1.3 | 0.6 | — | — |
| 10 | 3.7 | 1.6 | 0.7 | 0.1 | — |
| 11 | 4.4 | 1.9 | 0.8 | 0.2 | — |
| 12 | 5.1 | 2.2 | 0.9 | 0.2 | — |
| 13 | 6.1 | 2.6 | 1.0 | 0.3 | — |
| 14 | 7.2 | 3.1 | 1.1 | 0.3 | — |
| 15 | 8.3 | 3.6 | 1.2 | 0.4 | — |
| 16 | 9.5 | 4.1 | 1.4 | 0.4 | — |
| 17 | 10.7 | 4.6 | 1.6 | 0.5 | — |
| 18 | 12.0 | 5.2 | 1.8 | 0.6 | — |
| 19 | 13.4 | 5.8 | 2.0 | 0.7 | — |
| 20 | 15.0 | 6.5 | 2.2 | 0.8 | 0.4 |
| 25 | — | 10.3 | 3.7 | 1.3 | 0.5 |
| 30 | — | 15.0 | 5.2 | 1.8 | 0.7 |
| 35 | — | — | 7.3 | 2.6 | 1.0 |
| 40 | — | — | 9.6 | 3.3 | 1.3 |
| 50 | — | — | 15.0 | 4.9 | 1.9 |
| 60 | — | — | — | 7.2 | 2.7 |
| 70 | — | — | — | 9.8 | 3.7 |
| 80 | — | — | — | 12.8 | 4.9 |
| 90 | — | — | — | 16.1 | 6.2 |
| 100 | — | — | — | 20.0 | 7.8 |
| Note: Greatest flow shown for each meter is maximum safe flow capacity for meter. | |||||
Backflow Prevention
Most city and state plumbing codes require the installation of some type of backflow prevention device wherever a permanent irrigation system is connected to a municipal water supply. This device is designed to prevent contaminated water from the irrigation system from getting back into the main water supply.
Most codes require, as a minimum, a double-check valve device be installed at the point of connection. These devices range in price from $30 up to several hundred dollars depending on type and size.
Where a high degree of hazard exists, such as when fertilizers or chemicals are injected into the irrigation water, some codes require a more sophisticated device called a reduced pressure backflow preventer. These devices can be very expensive but, fortunately, they are usually not required for home irrigation systems because fertilizers are not injected.
Before installing an irrigation system with a municipal water supply, always check local and state codes to be sure you comply.
Irrigation Scheduling App for Turf
Much of this publication provides information on general scheduling methods and ways to prevent over- and underwatering your crop. Typically the amount of time the crop is watered is based on the soil type your lawn or garden is located in. However, there is currently an irrigation scheduling tool that can aid in more precisely predicting the water requirement of turf. The Smart Irrigation Turf Scheduling App is currently available through the iOS App Store for Apple devices and through Google play for Android devices.
The scheduling app will provide users with an estimate of irrigation run time needed (in minutes) to meet the current lawn turf water demand using a simplified approach for automated irrigation systems. The urban lawn model uses FAWN and GAEMN meteorological data to compute a simple, real-time weekly water balance. The model has different irrigation head types built in, including fixed spray, gear-driven rotary and impact. These irrigation types are user-selectable based on each individual user's irrigation system. Temperatures are monitored to determine if they are above the minimum temperature required for crop growth. If temperatures are below the minimum, irrigation should be limited or not scheduled.
It is recommended that the user install a rain gauge near the area being scheduled to record actual rainfall values at the area to ensure the app is recommending the most accurate irrigation rate possible by using the most accurate data available. The app will also provide the user with an estimate of water saved in gallons over the original timer schedule provided by the user. There is also a citrus, cotton and strawberry irrigation scheduling app that could be relevant to users of the turf app. Additional information on all four apps is available at .
Status and Revision History
Published on Jul 01, 1997
Published with Minor Revisions on Sep 07, 2006
Published with Minor Revisions on Feb 23, 2009
Published on May 14, 2009
Published with Minor Revisions on Mar 12, 2014
Published with Minor Revisions on Apr 30, 2017
