- Site and Soil Requirements
- Purchasing Trees
- Variety Selection
- Standard Trees versus Semi-dwarf and Dwarf Trees
- Soil Preparation and Planting
- Post-Planting Care
- Pruning and Training Apple Trees
- Fertilization
- Annual Fruit Production through Thinning
- How to Pick Apples
- Diseases and Insects
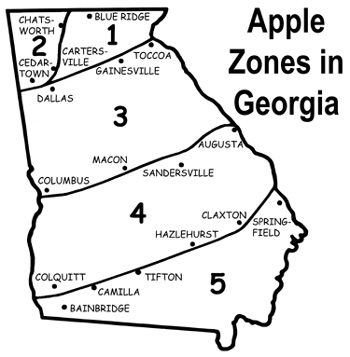
Apples are adapted to most areas of Georgia. Although the northern half of the state (Zones 1, 2, 3) is best suited for the more "conventional" apple varieties, you can have success in the southern half of Georgia with adapted varieties. Regardless of where you live, if you are not willing to provide timely care for your trees and fruit, then you might be happier in years to come if you choose plants that require less care.
Site and Soil Requirements
Sunlight, and plenty of it, is the key to increasing fruit production. Pick an area where the trees will be in the sun most or all of the day. The early morning sun is particularly important because it dries the dew from the leaves, thereby reducing the incidence of diseases. If the planting site does not get plenty of sun, then you can't expect the best performance from the tree.
Although apple trees will grow well in a wide range of soil types, a deep soil ranging in texture from a sandy loam to a sandy clay loam is preferred. Apple trees will not thrive in soil that is poorly drained. Roots will die in areas of poor drainage, resulting in stunted growth and eventual tree death. Conversely, apple trees will also perform poorly on droughty soils. Shoot growth can be stunted, resulting in reduced fruit size and quality.
Most fruit plants, including apples, grow best when the soil pH is near 6.5. Since the natural pH of most Georgia soils is below this level, you will need to incorporate lime before planting to raise the pH to the desired level. You can get information on soil testing and liming recommendations from your county Extension office. Check your soil pH about every 3 years. The soil test report will indicate if additional liming is required.
Purchasing Trees
The old adage "you get what you pay for" is an important consideration when buying apple trees. Often, bargain plants are not healthy or may not be a variety adapted to your area. Buy only trees of recommended varieties from a reliable source.
Listed below are a few points to keep in mind when purchasing apple trees:
- The preferred type of tree for planting is a healthy, 1-year-old whip that is approximately 4 to 6 ft tall and has a good root system.
- A small tree with a good root system is more desirable than a large tree with a poor root system.
- Trees that are 2 years old or older do not usually grow as well as 1-year-old trees. Frequently, older trees do not have sufficient buds on the lower portion of the trunk to develop a good framework.
- Do not purchase trees that appear stunted, poorly grown, diseased or insect injured.
- Check the trees closely to make sure that you are getting the variety and rootstock that you desire.
- Inspect the tree roots to make sure they are in good condition. They should feel firm, not spongy or brittle. Cutting through the surface of the root should reveal white to creamy-colored tissue. A tan or brown color indicates damaged or dying roots.
Variety Selection
There are apple varieties adaptable to most parts of Georgia. In selecting varieties to plant, determine which Apple Zone you live in (see map). If you live in Zone 5, you should be aware that this area is not ideally suited for apples. In most years, late frost will kill some of the apple flowers on the two varieties recommended for this area, thus reducing the crop. Table 1 lists the recommended varieties for the various areas of the state.
Some apple varieties such as Red Delicious and Golden Delicious are also available in various strains. A strain is a mutation of a certain variety selected for an improved characteristic, and vegetatively propagated by grafting. A strain may differ in fruit characteristics, tree characteristics or both. There are many strains of some varieties; for example, approximately 100 different strains of Red Delicious have been described and cultivated.
The most common strain difference that the backyard grower needs to be concerned with is spur-strains versus non-spur-strains. Spur-types, because of their compact form of growth, are ideally suited for home gardeners with limited space. Growth on spur-types is more compact as fruit spurs and leaf buds are spaced closer than on non-spur trees. On spur-type trees, 2-year-old wood will usually form fruit buds rather than develop side shoots. Several varieties are available in spur and non-spur strains. As a general rule of thumb, spur strains of the same variety on the same kind of rootstock as non-spur strains will result in trees only 70 percent as large as the non-spurs. Thus, a spur type strain grown on a seedling rootstock will result in a semi-dwarf tree and a spur-type grown on a semidwarf rootstock will result in a dwarf tree.
Table 1. Apple Varieties Recommended for Home Use for the Different Zones in Georgia |
|||
| Variety1 | Zone2 | Characteristics3 | Pollination Code4 |
| Anna | 5 | Excellent shaped fruit with a blush of red. Ripens mid-June to early July. Spur-type. | A |
| Dorsett Golden | 5 | Yellow apple of good quality. Ripens mid-June to early July. Spur-type. | A |
| Ginger Gold | 1-2-3 | Very early crisp yellow apple of excellent quality. Good for fresh eating, sauce and pies. Ripens late July to early August. Non-spur. | B |
| Gala | 1-2-3 | Excellent quality apple. Good for fresh eating or salads. Ripens early August. Non-spur. | B |
| Mollie's Delicious | 1-2-3-4 | A versatile apple. Good for fresh eating, pies and sauce. Ripens late July to early August. Nonspur. | B |
| Ozark Gold | 1-2-3 | Matures in early August. Yellow, russet-free apple of excellent quality. Nonspur. | B |
| Red Delicious | 1-2-3-4 | Early fall variety ripening in late August to early September. Large, firm, crisp, sweet. Good for fresh eating or salads. Non-spur and spur strains available. | B |
| Jonagold | 1-2-3 | Ripens early September. Very large, yellow apple with a red blush. Very high quality, sweet, juicy apple. | C |
| Golden Delicious | 1-2-3-4 | Ripens one to two weeks after Red Delicious. Good producer. Fruit good for sauce, fresh eating and pies. Nonspur and spur strains available. | C |
| Fuji | 1-2-3 | Fall variety ripens early October. Does not color well, but quality is superb. Good for cooking, eating and baking. Nonspur strains available. | B |
| Mutsu | 1-2-3 | Ripens early October. Yellow apple of exceptional quality. Crisp and juicy. Slightly tart. All-purpose. |
B |
| Rome Beauty | 1-2 | Ripens early October. Red apple primarily grown for baking. Spur and non-spur strains available. | C |
| Stayman | 1-2 | Ripens early October. Rusty red finish. Superb quality, tart, all-purpose apple. Fruit cracking a problem when dry period followed by rainy period. | C |
| Yates | 1-2-3-4 | Late fall variety ripens late October. Small, dark red, juicy, mellow, sub-acid. Best keeper. Non-spur. | B |
| Granny Smith | 1-2-3-4 | Matures late October to early November. Yellowgreen apple of excellent quality. Good all-purpose variety. Non-spur and spur strains available. |
B |
|
1 Listed in order of ripening. 2 See Apple Zone Map. 3 Ripening dates for all varieties except Anna and Dorsett Golden are based on averages from Athens, GA. Ripening dates for Anna and Dorsett Golden are based on averages from Monticello, FL. Non-spur and spur refer to growth habit, as previously described under "Variety Selection." 4 Varieties followed by a common letter bloom at approximately the same time. Since most apple varieties are self-unfruitful (require pollen from another variety to set fruit), plant two or more varieties that have the same letter so fruit set will result. Stayman, Mutsu and Jonagold have sterile pollen and should not be used as a pollen source for other varieties; therefore, plant at least two other varieties with any or all of these varieties. |
|||
| Disease-Resistant Varieties | ||
| Variety | Zone | Characteristics |
| Redfree | 1, 2, 3 | Fruit is crisp, juicy, russet-free. Ripens about six weeks before Delicious. |
| Liberty | 1, 2, 3 | Fruit is crisp, juicy, sub-acid. Stores well, ripens about two weeks before Delicious. |
| Freedom | 1, 2, 3 | Fruit is crisp, juicy, good for fresh and processing. Ripens with Delicious. |
| Enterprise | 1, 2, 3 | Fruit is spicy and sub-acid. Stores well, matures late. |
| Goldrush | 1, 2, 3 | Fruit is sweet, crisp, good for fresh and processing. Ripens late, stores very well. |
| Disease Resistance | ||||
| Variety | Apple Scab | Cedar Apple Rust | Powdery Mildew | Fireblight |
| Redfree | 8 | 8 | 7 | 7 |
| Liberty | 9 | 8 | 8 | 8 |
| Freedom | 9 | 7 | 7 | 6 |
| Enterprise | 9 | 8 | 6 | 8 |
| Goldrush | 9 | 3 | 7 | 5 |
| Rating Scale: 1 = Susceptible 9 = Immune |
||||
Standard Trees v. Semi-dwarf and Dwarf Trees
The two major factors influencing tree size are rootstock and type of strain used (spur or non-spur). Other factors that will influence ultimate tree size include general care, variety, soil type, earliness of fruiting, location within the state, and timing and severity of pruning.
Rootstock influences tree size: standard, semi-dwarf or dwarf. Standard trees are propagated on seedling rootstock and produce large trees that may get to be 20 ft tall or taller. Semi-dwarf trees are trees propagated on one of several clonal rootstocks (vegetatively propagated) that produce trees that will be about 50 to 80 percent the size of standard trees if grown under similar circumstances. The most common semidwarf rootstocks used for apples in Georgia are MM 106, MM 111 and M 7. Trees on M 7 will produce the smallest trees in the semi-dwarf category while MM 111 will produce trees nearly as large as trees on seedling rootstocks.
True dwarf trees will be about 30 to 40 percent as large as standard trees and require support by either a trellis or a post. The two most common dwarfing rootstocks are M 9 and M 26. Trees grown on M 9 are the smaller of the two.
Use dwarf and semi-dwarf trees if space is greatly limited. M 9, M 7 and MM 111 are better adapted to Zones 1, 2 and 3, while MM 106 has shown promise in the lower half of Zone 3 plus Zone 4. In Zone 5, only standard trees (seedling rootstock) are recommended due to poor performance of semi-dwarf and dwarf rootstocks. See Table 2 for tree spacing recommendations.
Pollination: See footnote 4 below the variety table (Table 1).
| Table 2. Suggested Tree Spacing Based on Rootstock and Tree Form (Non-spur versus spur). | |||||
| Rootstock | Between Trees in Row (ft) | Between Rows (ft) | |||
| Non-spur | Spur | Non-spur | Spur | ||
| Seedling | 18 | 12 | 22 | 18 | |
| MM 106 | 16 | 10 | 20 | 16 | |
| MM 111 | 16 | 8 | 20 | 14 | |
| M 7 | 12 | 8 | 18 | 14 | |
| M 26 | 10 | not recommended | 16 | not recommended | |
| M 9 | 8 | not recommended | 14 | not recommended | |
Soil Preparation and Planting
When fruit trees arrive from the nursery, open the bundles immediately. Soak the roots in water for 6 to 12 hr if they are not moist. The trees should then be planted if the soil is not too wet.
If the soil is not prepared where the trees are to be planted, or if the ground is too wet, heel the trees in by placing them in an open trench deep enough to cover all roots. The north side of a building is the best place for heeling because the trees will remain dormant longer. Place soil over the roots to the depth they will be planted in your yard.
Before planting, prepare the soil thoroughly by plowing or spading followed by disking or raking to smooth the surface. If you have not adjusted the soil pH to 6.5 previously, liming should be done before you prepare the soil so that the lime will be incorporated. When added to the surface and not plowed in, lime takes years to move down into the soil. Lime an area 10' x 10' where each tree will be planted. Similar to lime, phosphorus moves down through the soil slowly and thus should be incorporated, based on soil test results, along with lime before planting. During planting, dig holes large enough to receive the roots freely without cramping or bending from their natural position. Before planting, cut off all dead, broken or mutilated parts of roots with a sharp knife or pruning shears. Keep root pruning to a minimum. Set the plants at the same depth they grew in the nursery. Work soil in and around the roots. When the hole is half filled, firm the soil with your feet before you finish filling the hole. When the hole is filled, pack the soil firmly. Do not leave a depression around the tree. Also, do not place fertilizer in the planting hole or fertilize immediately after planting. This should only be done after the soil is settled by a drenching rain. When the planting is completed, the graft union should be at least 2 in. above the soil line.
Post-Planting Care
After planting, apply sufficient water to thoroughly soak the soil in the area of the tree roots. This watering will help bring the soil into closer contact with the roots and eliminate air pockets around the roots.
Keep weeds out of a 3' x 3' area around the tree because they compete with the tree for moisture and nutrients during the growing season. This will also keep mowers away from the trees and reduce trunk damage. Mulching will help control weeds as well as conserve moisture. Mulches should be kept about 12 in. away from tree trunks.
Pruning and Training Apple Trees
The day you plant your trees is the day you begin to prune and train for future production. Too often backyard growers plant apple trees and leave them untended for several years. This neglect causes poor growth and delayed fruiting.
The purpose of pruning a young tree is to control its shape by developing a strong, well-balanced framework of scaffold branches. Remove unwanted branches or cut them back early to avoid the necessity of large cuts in later years. Today, the recommended method of pruning and training is the Central Leader System, which exposes more foliage and fruits to direct sunlight than other tree forms.
Prune in late winter. Winter pruning of apple trees consists of removing undesirable limbs as well as tipping terminals to encourage branching. Similar pruning can be performed in the summer and is most beneficial if done in early June and early August.
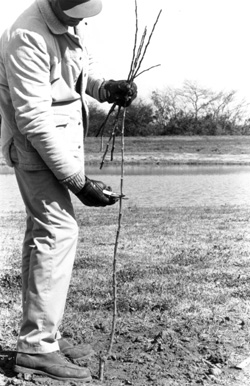 Figure 1.
At Planting: Whether you obtain a small unbranched whip or a larger branched tree, it is necessary to prune the tree at planting. Head the unbranched whip back to 24 to 30 in. from the ground (Figure 1). This will cause the buds just below the cut to grow and form scaffold branches. If branched 1- or 2-year-old trees are planted, then select four or five lateral branches with wide-angled crotches that are spaced equidistant around the tree and 2 to 5 in. apart vertically. The selected laterals should be no lower than 18 in. above the ground, and they should be pruned back slightly by cutting off one-fourth of each limb's length.
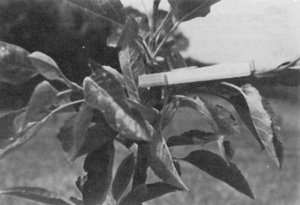 Figure 2.
First Growing Season: When 2 to 3 in. of growth have occurred, begin training the tree. Position wooden spring-type clothespins between the main branch and the new succulent growth (Figure 2). The clothespin will force the new growth outward and upward, thus forming the strong crotch angles needed to support the fruit load in years to come. The clothespins should be left on the tree for about six weeks.
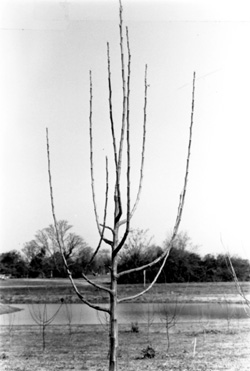 Figure 3.
 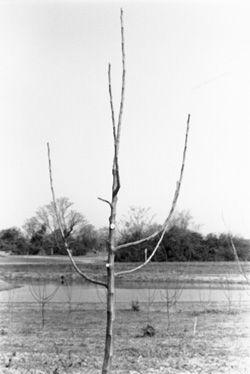 Figure 4.
One Year Old: A number of branches should have developed after the first growing season, and if they were clothespinned, they should have good, wide crotch angles. The objective now is to develop a strong central leader and framework of scaffold branches. Here we can see the 1-year-old tree before (Figure 3) and after (Figure 4) pruning. Note that we have left only four scaffold branches spaced around the tree. All the branches left, as well as the central leader, have been pruned back by about one-fourth. Always make sure the ends of the scaffold branches are below the end of the central leader after they have been pruned back.
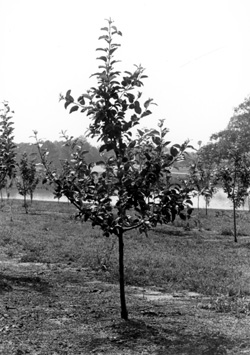 Figure 5.
Second Growing Season: During the second growing season, develop a second layer of scaffolds on the central leader 24 to 30 in. above the scaffolds you established the year before. Be sure to use the clothespins on new succulent growth, particularly shoots that develop below the central leader pruning cut, so you will develop wide crotch angles. Figure 5 illustrates a properly trained apple tree in late May of the second growing season.
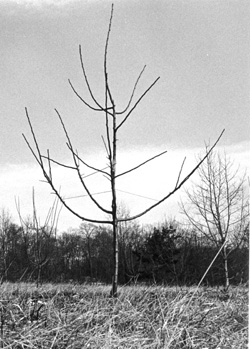 Figure 6.
Two Years Old: The use of limb spreaders can help bring about earlier fruit production, improved tree shape and strong crotch angles. Spreaders can either be short pieces of wood with sharpened nails driven into each end or sharpened metal rods. Limbs should be spread to a 45- to 60-degree angle but not below a 60-degree angle from the main trunk. Limbs spread wider than 60 degrees have a tendency to produce vigorous suckers along the top-side of the branch and may stop terminal shoot growth. The spreaders will need to remain in place for about six weeks until the wood "stiffens up." Figure 6 illustrates a 2-year-old tree after pruning in which metal rods have been used as spreaders. Pruning consists of entirely removing undesirable limbs and, only where necessary, reducing the length of terminal scaffolds by one-fourth. Weaker side limbs should not be pruned (unless excessively long) so they can develop flower buds. Excessive and unnecessary pruning will invigorate a tree and delay fruit production.
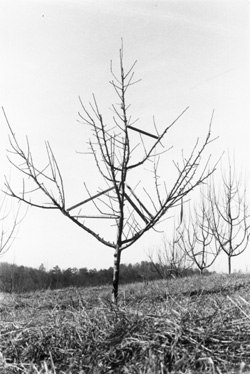 Figure 7.
Figure 7 is a tree approximately four years old. Proper training, spreading and pruning have resulted in the development of flower buds that will produce a good crop in the coming season.
Notice that the upper (second) set of scaffolds should be shorter than lower (first) set. The second and any succeeding scaffold layers should always be kept shorter by dormant pruning than the layer(s) below it. A properly trained and pruned central leader tree should conform to roughly a pyramidal (Christmas tree) shape.
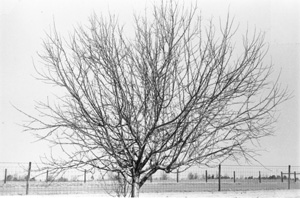 Figure 8.
Pruning Neglected Apple Trees: Many people will purchase a house where an apple tree was planted on the property several years ago. Often, the previous owner did not take the time to properly prune the tree and the result is similar to Figure 8. The tree has become bushy and weak and will produce very poor quality apples. Such a tree requires extensive corrective pruning.
The main objective in pruning such a tree is to try and open up the interior to allow good light penetration. The first step is to remove all the upright, vigorous growing shoots (at their base) that are shading the interior. As with the young apple trees, it is necessary to select three to five lower scaffold branches with good crotch angles that are spaced around the tree. Limbs with poor angles and excess scaffold limbs should be removed at their base. In some cases it is advisable to spread the corrective pruning over two to three seasons. When severe pruning is done in the winter, do not fertilize the trees that spring.
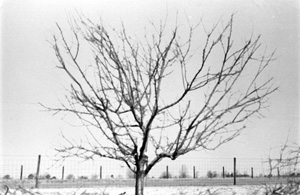 Figure 9.
Figure 9 is the same tree after the first season's pruning. The next year, it will be necessary to remove more limbs, especially on the left side. Note that most of the cuts were thinning types; that is, the wood was removed to its base or point of origin. When making these thinning cuts, make sure the cuts are flush along another limb.
The remaining limbs can be pruned back by one fourth of their length to a side limb if it is desired to stiffen them. If you don't cut them back, the limbs may bend and/or break under a heavy crop load.
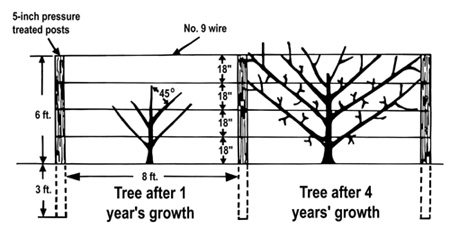 Figure 10.
Pruning and Training to the Trellis: Non-spur varieties on M 9 and M 26 and spur varieties on M 7 are the best to train to a trellis. To train trees to a trellis, start by planting the trees midway between the posts (Figure 10). Remember to keep the graft union above the ground. Cut the trees off at 24 in. high and loosely tie them to the bottom trellis wire. Allow young shoots to develop in spring and early summer.
Some shoots will develop outside the plane of the trellis (project away from the wire). Remove them, or bend and tie them to the wire so they fit the plane.
After the first growing season, tie the developed limbs to the wire so each will form a 45-degree angle with the main trunk (Figure 10). Avoid training limbs horizontally or flat along the wire as vigorous upright sprouts will develop along the upper surface of the limb at the expense of flower buds.
Remove undesirable limbs. Prune back the terminals of the tied limbs as well as the central trunk.
Pruning after the second growing season should be done similarly to the first season. Your goal is to fill the trellis area with limbs the first 2 or 3 years following planting to encourage tree growth. Once fruiting begins, the amount of necessary pruning will be reduced.
Periodically, limbs get old and production decreases. If a limb starts declining, prune it out and train a new one to take its place.
Girdling may result where the limbs and trunk are tied to the wires. Check these ties periodically to make sure they are still loose.
Fertilization
Generally, apple trees in Georgia need fertilizing each year. Nitrogen is the most important nutrient needed. Phosphorous and potassium should be applied before planting based on soil test recommendations. After the trees mature, fertilization with phosphorus and potassium will probably not be required; however, periodic soil testing should be done to monitor levels of these elements and soil pH.
To fertilize apple trees the year they are planted, broadcast over a 2-ft circle 1 cup of 10-10-10 fertilizer about one month after planting. Do not put any fertilizer in the hole before planting. In June following planting, broadcast another cup of 10-10-10 fertilizer around the tree.
In early spring of the second season (when the tree is one year old), broadcast 2 cups of 10-10-10 fertilizer over a 3-ft circle. Repeat this again in June.
In succeeding years, follow these guidelines for the different trees:
Standard Trees: Increase the diameter of the broadcast circle and the amount of fertilizer (10-10-10) by 2 cups per year. When the tree is six years old and older, only nitrogen fertilizer is needed. Use 4 cups of ammonium nitrate per tree for trees six to eight years old and 6 cups for trees nine years old and older.
If you severely prune the tree, do not apply any fertilizer that year. If growth is excessive, omit fertilizer for a year or two until growth is reduced to a desirable amount (terminal growth on bearing trees averaging 10 to 15 in. per year).
Semi-dwarf Trees Increase the diameter of the broadcast circle and the amount of fertilizer (10-10-10) by 2 cups per year. Once the trees reach 4 years of age, apply 8 cups of 10-10-10 per tree. Apply this amount in years 5 through 7. For trees 8 years old and older, apply 4 cups of ammonium nitrate per tree. If, in any given year, you severely prune the trees or the trees are too vigorous, omit fertilizer that year.
Dwarf Trees: During the third and fourth season, broadcast over a 4-ft circle 4 cups of 10-10-10 around each tree both years. Trees in their fifth and sixth seasons should receive 6 cups of 10-10-10 per tree broadcast over a 5-ft diameter circle. Seven-year-old and older trees should receive only nitrogen at a rate of about 2 cups of ammonium nitrate per tree. Broadcast this over a 5-ft diameter area.
Caution: When fertilizing, never dump large amounts in a small area. Root burn may result. Also, keep fertilizer 6 in. or more away from the trunk. Always broadcast the fertilizer evenly over the recommended area.
Once the trees begin to bear fruit, use shoot growth to determine if you need to reduce or supplement the fertilization rates previously suggested. Ten to 15 in. of growth are ideal for bearing, non-spur type trees and 8 to 10 in. for spur type trees. If growth is more than this, apply less fertilizer. If growth is less, apply a little extra fertilizer the next season.
Annual Fruit Production through Thinning
Apple trees grown under favorable conditions will set more fruit than they can successfully carry to maturity. The removal of excess fruit from the trees is essential to ensure satisfactory development of color, shape and size of the apples remaining on the tree. Failure to remove the excess fruit will decrease flower formation for the following year and cause the tree to only produce a crop every other year.
Remove fruit by hand, reducing the apples to one per cluster with fruiting clusters spaced about every 6 in. along the limb. To remove fruit without damaging the spur or other apples on the spur, hold the stem between the thumb and forefinger and push the fruit from the stem with the other fingers. This method will remove the apple, leaving the stem attached to the spur.
The earlier hand-thinning is completed, the more effective it will be. Mid-summer thinning will help improve fruit size, but it will not aid the formation of next year’s flower buds. Most of the flower buds for next year are initiated during a 4- to 6-week period following full bloom, so you need to thin before this time.
How to Pick Apples
When picking apples, be careful to avoid injuring the fruit. Remove the apple from the spur by pulling upward and outward while rotating the fruit slightly. On some of the thin, long-stemmed varieties such as Golden Delicious, it may be necessary to firmly place the index finger at the point of attachment of the stem and spur to prevent the spur from breaking. Pick apples with their stems attached to the fruit; otherwise, they will not keep as long.
Diseases and Insects
A grower who produces the best quality fruit controls diseases and insects. Several of these pests damage the tree and fruit.
Diseases common to apples that should be controlled include scab, black rot, bitter rot, alternaria and fire blight. Damaging insects include apple tree borers, red spider mites, scales, aphids and fruit worms.
For more information, check with your county Extension agent or visit the ½ûÂþÌìÌà Cooperative Extension website.
The most successful home orchardist follows recommendations to the letter and uses the recommended kind and rate of spray material. It is imperative that complete coverage is maintained by applying the spray material at the proper time interval.
The wise fruit gardener will also handle these pesticides as dangerous chemicals, keeping them stored in their original containers with labels intact, behind locked doors and out of reach of children and pets.
Original publication developed by , Extension horticulturist, and later revised by
G.W. Krewer, former Extension horticulturist, and David W. Lockwood, former ½ûÂþÌìÌà plant scientist.
Status and Revision History
Published on Aug 19, 2002
Published with Minor Revisions on Nov 30, 2007
In Review on Feb 24, 2009
Published on Apr 20, 2009
Published with Minor Revisions on Apr 30, 2012
Published with Full Review on May 25, 2017
Published with Full Review on Jul 06, 2022
